1.函数
1.1 内联函数inline
为了提高程序运行的速度,引入内联关键字inline
编译器会将调用函数的地方直接替换为函数代码。这样程序就无需跳转到函数地址再跳回来。因此速度更快,但是代价是需要占用更多的内存
1
2
3
4
5
6
| inline double square(double x){return x*x}
int main(){
double a = 13.0;
double b = square(a);
}
|
1.2 引用&
引用可以理解为变量的别名,使得函数使用原始数据,而不是副本。
主要的用途是用作函数的形参
1
2
3
4
5
6
7
| void func(int &b){
}
void main(){
int a=10;
func(a);
}
|
注意:引用在声明的时候就要进行初始化,而且后面不能改变,“忠一”
如果对象是数组,则使用const指针(常量指针)
1.3 函数重载
可以有多个同名的函数,但是他们有不同返回值或不同的参数列表
1
2
3
4
5
| int func();
int func(int a);
int func(double a);
void func();
void func(int a,int b);
|
函数重载不会区分const关键字以及引用&
比如void func(cont double a)和void func(double a)以及void func(double &a)都是一样的
2.基本语法
2.1
cin、cin.get、cin.getline的使用
cin输入后换行符会留在输入缓冲区中
cin.getline(name,length)输入一行后会丢弃换行符,用空字符'\0'替换换行符
cin.get(name,length)输入一行后不丢弃换行符,同时会把换行符留在输入缓冲区中
但是,同时使用cin输入时,>>会自动跳过空字符(包括换行符)
1
2
3
4
| string str;
cin >> str;
cin.get();
cin.getline(str,10);
|
2.2 共用体Union
共用体常用于节省内存,可以说是对一个内存的复用
1
2
3
4
5
| Union m_Union{
int int_val;
double double_val;
long long_val;
};
|
申请的空间长度等于共用体内最长的数据类型的大小。
1
2
3
4
| void main(){
m_Union a;
a.int_val=10;
}
|
2.3 extern "C"
extern “C” 主要作用就是为了能够正确实现 C++ 代码调用其他 C 语言代码。
extern “C”
会指示编译器这部分代码按 C 语言的进行编译,而不是 C++。
3.线程和进程
线程是轻量级的进程
区别:
- 进程拥有自己独立的地址空间,多个线程公用同一个地址空间
- 进程是资源分配的最小单位,线程是操作系统的最小调度单位
- 线程在CPU上的上下文切换速度更快
3.1 pthread 线程
创建线程需要包含<pthread>头文件,需要链接动态库-lpthread
每一个线程都有唯一的线程id,数据类型为pthread_t
可以通过pthread_self()函数获取当前线程id
1
| pthread_t tid = pthread_self(void);
|
3.1.1 创建
1
| int pthread_create(pthread_t *tid, NULL, void *func, void *arg);
|
- tid:线程创建成功会写入线程id到此处
- 线程的属性, 一般情况下使用默认属性即可, 写NULL
- func:函数指针,创建出的子线程的处理动作
- arg:作为实参传递到 start_routine 指针指向的函数内部
- 返回值:线程创建成功返回0,创建失败返回对应的错误号
1
2
3
4
5
6
7
8
9
10
11
12
13
14
15
16
17
18
19
20
21
22
23
24
25
26
27
28
29
30
31
32
33
34
35
|
#include <stdio.h>
#include <stdlib.h>
#include <unistd.h>
#include <string.h>
#include <pthread.h>
void* working(void* arg)
{
printf("我是子线程, 线程ID: %ld\n", pthread_self());
for(int i=0; i<9; ++i)
{
printf("child == i: = %d\n", i);
}
return NULL;
}
int main()
{
pthread_t tid;
pthread_create(&tid, NULL, working, NULL);
printf("子线程创建成功, 线程ID: %ld\n", tid);
printf("我是主线程, 线程ID: %ld\n", pthread_self());
for(int i=0; i<3; ++i)
{
printf("i = %d\n", i);
}
return 0;
}
|
3.1.2 退出
上述例子中,子线程被创建出来之后需要抢cpu时间片,
抢不到就不能运行,一旦主线程退出了, 虚拟地址空间就被释放了,
子线程就一并被销毁了。
如果想要让线程退出,但是不会导致虚拟地址空间的释放(针对于主线程),我们就可以调用线程库中的线程退出函数,只要调用该函数当前线程就马上退出了,并且不会影响到其他线程的正常运行,不管是在子线程或者主线程中都可以使用。
1
2
| #include <pthread.h>
void pthread_exit(void *retval);
|
- 参数:
线程退出的时候携带的数据,当前子线程的主线程会得到该数据。如果不需要使用,指定为NULL
1
2
3
4
5
6
7
8
9
10
11
12
13
14
15
16
17
18
19
20
21
22
23
24
25
26
27
28
29
30
31
32
33
34
35
36
37
38
39
40
41
| #include <stdio.h>
#include <stdlib.h>
#include <unistd.h>
#include <string.h>
#include <pthread.h>
void* working(void* arg)
{
sleep(1);
printf("我是子线程, 线程ID: %ld\n", pthread_self());
for(int i=0; i<9; ++i)
{
if(i==6)
{
pthread_exit(NULL);
}
printf("child == i: = %d\n", i);
}
return NULL;
}
int main()
{
pthread_t tid;
pthread_create(&tid, NULL, working, NULL);
printf("子线程创建成功, 线程ID: %ld\n", tid);
printf("我是主线程, 线程ID: %ld\n", pthread_self());
for(int i=0; i<3; ++i)
{
printf("i = %d\n", i);
}
pthread_exit(NULL);
return 0;
}
|
3.1.3 回收
子线程退出时,内核资源主要由主线程回收,通过pthread_join()函数实现
此函数为阻塞函数,函数被调用一次,只能回收一个子线程,如果有多个子线程则需要循环进行回收。
1
2
3
4
| #include <pthread.h>
int pthread_join(pthread_t thread, void **retval);
|
1
2
3
4
5
6
7
8
9
10
11
12
13
14
15
16
17
18
19
20
21
22
23
24
25
26
27
28
29
30
31
32
33
34
35
36
37
38
39
40
41
42
43
44
45
46
47
48
49
50
51
52
53
54
55
56
57
58
59
60
61
|
#include <stdio.h>
#include <stdlib.h>
#include <unistd.h>
#include <string.h>
#include <pthread.h>
struct Persion
{
int id;
char name[36];
int age;
};
void* working(void* arg)
{
printf("我是子线程, 线程ID: %ld\n", pthread_self());
for(int i=0; i<9; ++i)
{
printf("child == i: = %d\n", i);
if(i == 6)
{
struct Persion p;
p.age =12;
strcpy(p.name, "tom");
p.id = 100;
pthread_exit(&p);
}
}
return NULL;
}
int main()
{
pthread_t tid;
pthread_create(&tid, NULL, working, NULL);
printf("子线程创建成功, 线程ID: %ld\n", tid);
printf("我是主线程, 线程ID: %ld\n", pthread_self());
for(int i=0; i<3; ++i)
{
printf("i = %d\n", i);
}
void* ptr = NULL;
pthread_join(tid, &ptr);
struct Persion* pp = (struct Persion*)ptr;
printf("子线程返回数据: name: %s, age: %d, id: %d\n", pp->name, pp->age, pp->id);
printf("子线程资源被成功回收...\n");
return 0;
}
|
3.1.4 线程分离
如果采用pthread_join(),主线程就会一直阻塞等待子线程运行完成,
采用pthread_detach()即可完成线程分离,调用这个函数之后指定的子线程就可以和主线程分离,当子线程退出的时候,其占用的内核资源就被系统的其他进程接管并回收了。线程分离之后在主线程中使用pthread_join()就回收不到子线程资源了。
1
2
3
4
5
6
7
8
9
10
11
12
13
14
15
16
17
18
19
20
21
22
23
24
25
26
27
28
29
30
31
32
33
34
35
36
37
38
39
| #include <stdio.h>
#include <stdlib.h>
#include <unistd.h>
#include <string.h>
#include <pthread.h>
void* working(void* arg)
{
printf("我是子线程, 线程ID: %ld\n", pthread_self());
for(int i=0; i<9; ++i)
{
printf("child == i: = %d\n", i);
}
return NULL;
}
int main()
{
pthread_t tid;
pthread_create(&tid, NULL, working, NULL);
printf("子线程创建成功, 线程ID: %ld\n", tid);
printf("我是主线程, 线程ID: %ld\n", pthread_self());
for(int i=0; i<3; ++i)
{
printf("i = %d\n", i);
}
pthread_detach(tid);
pthread_exit(NULL);
return 0;
}
|
3.1.5 线程取消
1
2
3
| #include <pthread.h>
int pthread_cancel(pthread_t thread);
|
- 参数:要杀死的线程的线程ID
- 返回值:函数调用成功返回0,调用失败返回非0错误号。
3.1.6 pthread_t的比较
1
2
| #include <pthread.h>
int pthread_equal(pthread_t t1, pthread_t t2);
|
- 参数:t1 和 t2 是要比较的线程的线程ID
- 返回值:如果两个线程ID相等返回非0值,如果不相等返回0
3.2 C11 thread 线程
3.2.1 整体流程
1
2
3
4
5
6
7
8
| void func(){
}
void main(){
std::thread t(func);
std::cout << t.get_id() << std::endl;
t.join();
}
|
3.2.1.1 thread() 构造函数
默认构造函数:创建一个线程对象而不启动任何线程,此时线程对象未与任何线程函数关联。
带参数构造函数:创建一个线程对象,并立即关联指定的线程函数func,同时将args1,
args2, ...作为线程函数的参数传递。
==线程在构造完成后随即开始执行。==
1
2
3
4
5
6
7
8
| void func(int arg){ }
void main(){
std::thread t1;
std::thread t2 = std::thread();
std::thread t3(func, 1);
std::thread t4 = std::thread(func,1);
}
|
3.2.1.2 get_id() 成员函数
返回当前线程对象所代表的线程ID,每个线程都有唯一的标识符。
3.2.1.3 joinable() 成员函数
判断线程对象是否仍然代表着一个可加入(join)的线程,即该线程是否仍在执行。如果线程仍在运行,则joinable()返回true。
1
2
3
4
5
6
7
8
9
10
11
12
13
14
15
16
17
18
19
20
| #include <iostream>
#include <thread>
void thread_func() {
std::cout << "线程正在运行..." << std::endl;
std::this_thread::sleep_for(std::chrono::seconds(1));
}
int main() {
std::thread t1(thread_func);
t1.join();
if (t1.joinable()) {
std::cout << "线程t1有效且活动" << std::endl;
} else {
std::cout << "线程t1无效或非活动" << std::endl;
}
return 0;
}
|
3.2.1.4 join() 成员函数
当调用线程对象的join()方法时,主线程会阻塞直到目标线程执行完毕。一旦目标线程结束,join()函数返回,主线程得以继续执行。
3.2.1.5 detach() 成员函数
调用detach()方法后,线程对象与其代表的线程分离。分离后的线程成为一个后台线程,不再受原线程对象的生命周期约束。这意味着即使主线程结束,被detach的子线程仍将继续独立运行,其执行状态与主线程不再直接相关联。主线程不再负责等待或管理这个分离线程的终止。
3.2.2 线程函数类型
3.2.2.1 函数指针
直接指定一个全局或类静态成员函数作为线程执行体。
1
2
| void ThreadFunc(int a);
thread t1(ThreadFunc, 10);
|
3.2.2.2 Lambda表达式
利用C++11的Lambda特性,创建一个匿名函数作为线程执行体。
1
| thread t2([]{cout << "Thread2" << endl; });
|
或
1
2
| auto func = [](){cout << "Thread2" << endl; };
thread t3(func);
|
3.2.3 互斥锁
3.2.3.1 std::mutex
最基本的 Mutex 类,独占的互斥量,不能递归使用。
不允许拷贝构造,也不允许 move 拷贝,最初产生的 mutex 对象是处于
unlocked 状态的。
1
2
3
4
5
6
| lock()
unlock()
try_lock()
(1). 如果当前互斥量没有被其他线程占有,则该线程锁住互斥量,直到该线程调用 unlock 释放互斥量。
(2). 如果当前互斥量被其他线程锁住,则当前调用线程返回 false,而并不会被阻塞掉。
(3). 如果当前互斥量被当前调用线程锁住,则会产生死锁(deadlock)。
|
1
2
3
4
5
6
7
8
9
10
11
12
13
14
| std::mutex t_lock;
void func(){
t_lock.lock();
std::cout << "Thread" << std::endl;
t_lock.unlock();
}
void main(){
std::thread t[5];
for(int i=0; i<5; i++)
t[i] = std::thread(func);
for(int i=0; i<5; i++){
t[i].join();
}
}
|
3.2.3.2 std::recursive_mutex
允许一个线程对互斥量进行多次锁定
当线程首次调用lock()时,互斥量被锁定,再次调用lock()时,不会引起死锁,而是增加锁的计数。同样,必须调用相同次数的unlock()才能完全释放互斥锁,使得其他线程有机会获取锁。
3.2.3.3 std::timed_mutex
除了提供std::mutex的基础锁定和解锁功能外,还额外提供了两个尝试锁定并带超时控制的方法。:
try_lock_for(const std::chrono::duration& rel_time):在给定的时间范围内获取互斥锁,如果没获得锁就被阻塞住,如果超时(即在指定时间内还是没有获得锁),则返回
false。try_lock_until(const std::chrono::time_point& abs_time):在指定的绝对时间点前获取互斥锁,如果没获得锁就被阻塞住,如果超时(即在指定时间内还是没有获得锁),则返回
false。
1
2
3
4
5
6
7
8
9
10
11
12
13
14
15
16
17
18
19
20
21
22
23
24
25
26
27
28
29
30
31
32
33
34
35
36
37
| #include <iostream>
#include <thread>
#include <chrono>
#include <mutex>
std::timed_mutex mtx;
void threadFunction()
{
using namespace std::chrono_literals;
if (mtx.try_lock_for(500ms))
{
std::cout << "Thread acquired the lock." << std::endl;
std::this_thread::sleep_for(1s);
mtx.unlock();
}
else
{
std::cout << "Thread failed to acquire the lock within 500 milliseconds." << std::endl;
}
}
int main()
{
mtx.lock();
std::thread worker(threadFunction);
std::this_thread::sleep_for(1000ms);
mtx.unlock();
worker.join();
return 0;
}
|
3.2.4 lock_guard与unique_lock
加锁和解锁两个操作完成互斥量的访问,但是可能会经常忘记解锁导致死锁,
C++11引入了基于Resource Acquisition Is Initialization
(RAII)原则的智能锁包装类,如std::lock_guard和std::unique_lock。
1
2
3
4
5
6
7
8
9
10
11
12
13
14
15
16
17
18
19
20
21
22
23
24
25
26
27
28
29
30
31
32
33
34
35
36
37
38
39
40
41
42
| #include <thread>
#include <mutex>
#include <iostream>
int number = 0;
std::mutex g_lock;
void ThreadProc1()
{
for (int i = 0; i < 100; i++)
{
std::lock_guard<std::mutex> guard(g_lock);
++number;
std::cout << "thread 1 : " << number << std::endl;
}
}
void ThreadProc2()
{
for (int i = 0; i < 100; i++)
{
std::lock_guard<std::mutex> guard(g_lock);
--number;
std::cout << "thread 2 : " << number << std::endl;
}
}
int main()
{
std::thread t1(ThreadProc1);
std::thread t2(ThreadProc2);
t1.join();
t2.join();
std::cout << "number: " << number << std::endl;
getchar();
return 0;
}
|
lock_guard的缺陷:太单一,用户没有办法对该锁进行控制,因此C++11又提供了
unique_lock。
1
2
3
4
5
6
7
8
9
10
11
12
13
14
15
16
17
18
19
20
21
22
23
24
25
26
27
28
29
30
31
32
33
34
35
36
| #include <iostream>
#include <thread>
#include <mutex>
#include <chrono>
std::mutex mtx;
void worker(int id) {
std::unique_lock<std::mutex> lock(mtx, std::defer_lock);
std::this_thread::sleep_for(std::chrono::milliseconds(id * 100));
if (lock.try_lock_for(std::chrono::milliseconds(50))) {
std::cout << "Worker " << id << " got the lock.\n";
std::cout << "Critical section for Worker " << id << ".\n";
} else {
std::cout << "Worker " << id << " could not acquire the lock within 50ms.\n";
}
}
int main() {
std::thread t1(worker, 1);
std::thread t2(worker, 2);
t1.join();
t2.join();
std::cout << "Both workers have finished.\n";
return 0;
}
|
3.2.5 原子操作
互斥锁的使用往往伴随着一定的开销,特别是在频繁加解锁的场景下,可能会影响到程序的执行效率。
C++11引入了原子操作(Atomic
Operations)的概念,它提供了一种更为细粒度的同步机制。
通过<atomic>头文件提供了std::atomic模板类来支持原子操作。
1
2
3
4
5
6
7
8
9
10
11
12
13
14
15
16
17
18
19
20
21
22
23
24
25
26
| #include <iostream>
#include <thread>
#include <atomic>
std::atomic<long> sum{ 0 };
void fun(size_t num)
{
for (size_t i = 0; i < num; ++i)
sum++;
}
int main()
{
std::cout << "Before starting threads, sum = " << sum << std::endl;
std::thread t1(fun, 1000000);
std::thread t2(fun, 1000000);
t1.join();
t2.join();
std::cout << "After joining threads, sum = " << sum << std::endl;
return 0;
}
|
atomic禁止拷贝构造
4.C++11新特性
4.1 lamada
本质是匿名函数可以让代码变得简洁.并且可以提高代码的可读性
1
2
3
4
5
6
7
8
9
10
11
12
| #include <algorithm>
#include <cmath>
void abssort(float* x, unsigned n) {
std::sort(x, x + n,
[](float a, float b) -> bool {
return (std::abs(a) < std::abs(b));
}
);
}
|
捕获列表:(capture list)(在 C++ 规范中也称为
Lambda 引导。) 参数列表:(parameters list)(可选)。
(也称为 Lambda 声明符) mutable 规范:(可选)。
异常说明:exception-specification(可选)。
返回类型:trailing-return-type(可选)。 Lambda
体:也就是函数体。
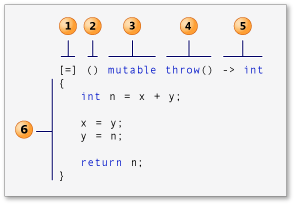 标识 lambda
表达式的各个部分的示意图。
标识 lambda
表达式的各个部分的示意图。
 在这里插入图片描述
Lambda表达式的捕获列表用于指定Lambda表达式中使用的外部变量。捕获列表可以为空,也可以包含以下内容:
- []:不捕获任何外部变量;
- [&]:以引用方式捕获所有外部变量;
- [=]:以值方式捕获所有外部变量;
- [var1, var2, ...]:指定捕获特定的外部变量;
- [&, var1, var2,
...]:以引用方式捕获所有外部变量,并指定捕获特定的外部变量;
- [=, &var1, &var2,
...]:以值方式捕获所有外部变量,并以引用方式捕获特定的外部变量。
捕获可以传引用,传参是传副本。
4.2 auto 和 decltype
auto关键字可以进行自动类型推导,节省代码量
1
2
3
| vector<int> vec;
vector<int>::iterator it = vec.begin();
auto it = vec.begin();
|
decltype 用于实体或者表达式的类型推导
编译器会分析f()会返回值是什么类型,返回的类型就是定义的类型,不会实际调用!!!!!!
1
2
3
4
| int f1(){return 1;}
double f2(){return 2;}
decltype(f1()) a = f();
|
4.3 区域for循环
1
2
3
| for(const auto & num : nums){
cout << num << endl;
}
|
4.4 智能指针
4.4.1 unique_ptr
头文件为<memory>
对*和->运算符进行重载,使unique_ptr对象具有指针一样的行为。
构造函数和拷贝赋值函数后面加上=delete,防止外部进行调用
4.4.1.1 模拟实现
1
2
3
4
5
6
7
8
9
10
11
12
13
14
15
16
17
18
19
20
21
22
23
24
25
26
27
28
29
30
31
32
33
34
35
36
37
38
39
| template<class T>
class unique_ptr
{
public:
unique_ptr(T* ptr)
:_ptr(ptr)
{}
~unique_ptr()
{
delete _ptr;
cout << _ptr << endl;
}
unique_ptr(const unique_ptr<T>& up) = delete;
unique_ptr<T>& operator=(const unique_ptr<T>& up) = delete;
T& operator*()
{
return *_ptr;
}
T* operator->()
{
return return _ptr;
}
T& operator[](size_t pos)
{
return _ptr[pos];
}
private:
T* _ptr;
};
|
4.4.1.2 声明
1
| std::unique_ptr<int> up1(new int(0));
|
4.4.2 shared_ptr
shared_ptr是C++11的智能指针,通过引用计数的方式解决智能指针的拷贝问题。
引用计数的方式能够支持多个对象一起管理一个资源,也就支持智能指针的拷贝,只有当资源的引用计数减为0时才会释放,保证了同一个资源不会被多次释放:
1
2
3
4
5
6
7
8
9
10
11
12
13
14
15
| int main()
{
std::shared_ptr<int> sp1(new int(1));
std::shared_ptr<int> sp2(sp1);
*sp1 = 10;
*sp2 = 20;
cout << sp1.use_count() << endl;
std::shared_ptr<int> sp3(new int(1));
std::shared_ptr<int> sp4(new int(2));
sp3 = sp4;
cout << sp3.use_count() << endl;
return 0;
}
|
4.4.2.1模拟实现
1
2
3
4
5
6
7
8
9
10
11
12
13
14
15
16
17
18
19
20
21
22
23
24
25
26
27
28
29
30
31
32
33
34
35
36
37
38
39
40
41
42
43
44
45
46
47
48
49
50
51
52
53
54
55
56
57
58
59
60
61
62
| template<class T>
class shared_ptr
{
public:
shared_ptr(T* ptr):_ptr(ptr), _pcount(new int(1)){}
~shared_ptr(){
Release();
}
shared_ptr(const shared_ptr<T>& sp):_ptr(sp._ptr), _pcount(sp._pcount){
++(*_pcount);
}
void Release(){
if (--(*_pcount) == 0){
delete _pcount;
delete _ptr;
}
}
shared_ptr<T>& operator=(const shared_ptr<T>& sp){
if (_ptr != sp._ptr)
{
Release();
_pcount = sp._pcount;
_ptr = sp._ptr;
++(*_pcount);
}
return *this;
}
int use_count()
{
return *_pcount;
}
T& operator*()
{
return *_ptr;
}
T* operator->()
{
return _ptr;
}
T& operator[](size_t pos)
{
return _ptr[pos];
}
private:
T* _ptr;
int* _pcount;
};
|